Simple lined zipper pouch
Take a first step into zipper sewing with a small lined pouch that keeps the construction sequence visible and manageable.
Confident beginner
Zipper foot · lining · turning
1/2 in body seams
Confirm zipper-foot compatibility
Cutting plan
Cut two outer rectangles and two lining rectangles, each 10 × 7 in. Use a regular nylon-coil zipper at least 10 in long; a slightly longer zipper can be easier for a beginner because the metal stops can remain outside the sewing area. The pouch dimensions are intentionally simple rather than optimized around a particular commercial zipper size.
10 × 7 in
10 × 7 in
10 in or slightly longer
1. Understand the zipper sandwich
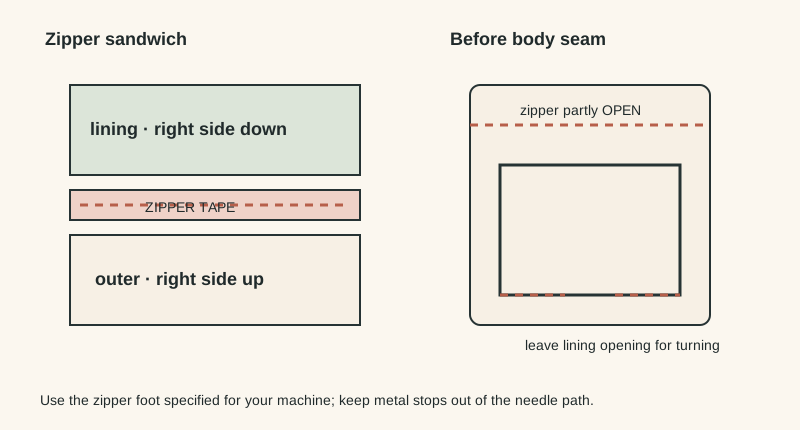
Place one outer piece right side up. Center the zipper along its top edge with the zipper right side facing the outer fabric. Place one lining piece right side down on top. The zipper tape is sandwiched between the fabrics. Pin or clip without distorting the zipper tape.
2. Use the correct foot for your machine
Fit the regular zipper foot specified for your sewing machine and follow your machine manual for attachment and needle position. A zipper foot is designed to let you stitch close to zipper teeth. This project does not require an invisible-zipper foot. Before sewing, turn the handwheel slowly through a stitch to confirm the needle will clear the foot.
3. Sew both sides of the zipper
Sew the first sandwich along the zipper tape, then fold the outer and lining away from the teeth and press carefully at a temperature suitable for the zipper and fabric. Repeat with the second outer and lining pieces on the other zipper tape. Optional topstitching can help keep fabric away from the teeth, but test the result before committing.
4. Open the zipper before closing the pouch
This checkpoint matters: leave the zipper at least halfway open. Match the two outer pieces right sides together and the two lining pieces right sides together. Keep the zipper teeth and seam junctions aligned as neatly as practical.
5. Sew around the body
Using a 1/2 in seam allowance, sew around the perimeter while leaving a 3–4 in opening in the bottom of the lining. At the zipper ends, sew beside the stops rather than forcing the needle through metal. If your zipper is longer than the fabric, keep its metal components safely outside the seam path.
6. Turn, close and test
Trim bulky corners without cutting the stitching, turn through the lining opening and then through the open zipper. Push out the corners gently. Close the lining opening by machine close to the folded edge or by hand, place the lining inside, and operate the zipper several times to check that fabric does not catch.
What this project teaches
The important skill is not speed; it is learning the order of layers and understanding why a narrow zipper foot gives the needle access beside the teeth. If the first zipper looks uneven, use it as a diagnostic sample: compare the distance from the teeth on both sides, check whether the layers shifted, and verify that your foot and needle position match the machine manual.
Before cutting valuable fabric
- Practise with the zipper foot on scraps before assembling the pouch.
- Never sew over metal zipper stops.
- Confirm the needle clears the presser foot by turning the handwheel manually before powered sewing.
- Keep the zipper partly open before sewing the body perimeter so the pouch can be turned.