Structured fabric storage basket
Combine interfacing, lining and boxed corners in a small structured basket that introduces simple three-dimensional sewing.
Confident beginner
Interfacing · lining · boxed corners
1/2 in
Test interfacing on scrap
Cutting plan
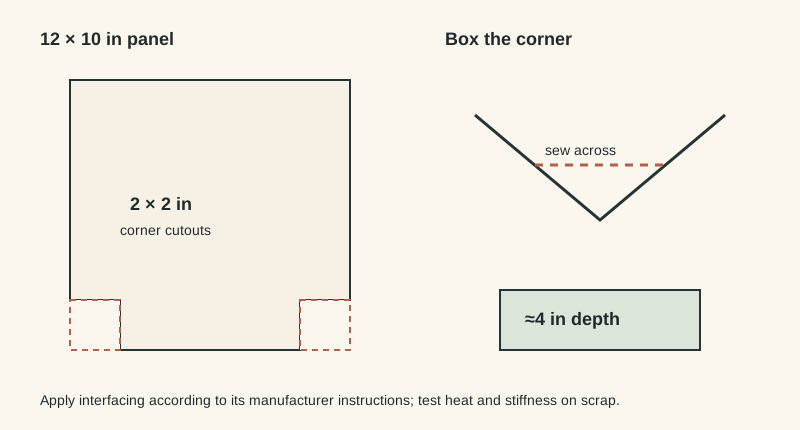
Cut two outer pieces, two lining pieces and two interfacing pieces, each 12 × 10 in. From each lower corner of the fabric pieces, mark a 2 × 2 in square measured from the raw edges. Do not cut those squares away until you have checked that all pieces match.
12 × 10 in
12 × 10 in
follow product suitability
2 × 2 in
Understand the boxed-corner geometry
When the two edges of a 2 in corner cutout are brought together and sewn, the resulting base depth is approximately 4 in before small seam effects. The basket's exact finished width and height also depend on the 1/2 in seams and how firmly the interfacing supports the fabric. This is why the diagram shows construction relationships rather than pretending to be a full-size pattern.
1. Apply the interfacing
Choose interfacing compatible with your outer fabric and the structure you want. Follow the interfacing manufacturer's instructions for temperature, steam, pressure and cooling; fusible products are not all applied the same way. Test a scrap first because heat or adhesive can change the fabric's surface.
2. Sew the outer shell
With outer pieces right sides together, sew the two side seams and bottom seam at 1/2 in, stopping at the corner cutouts. Press as appropriate. At one lower corner, open the cutout and bring the side seam and bottom seam together so their seam lines meet. The raw cutout edges form a straight line.
3. Box both outer corners
Sew across each aligned corner at 1/2 in. Repeat for the other corner. Turn the shell right side out and check that it sits reasonably square. If one corner twists, inspect whether the side and bottom seam lines were matched before stitching.
4. Make the lining
Repeat the side, bottom and boxed-corner construction with the lining, but leave a 4–5 in opening in the lining bottom seam for turning. Keep the opening away from the boxed corners so those seams can remain uninterrupted.
5. Join outer and lining
Place the outer shell right side out inside the lining, which should be wrong side out. Their right sides now face each other. Match side seams and top raw edges, then sew around the top at 1/2 in.
6. Turn and finish
Turn the basket through the lining opening. Push the lining into the outer shell and press the top edge carefully. Optional topstitching can help the edge sit neatly. Close the lining opening by machine close to the fold or by hand.
Structure checkpoint
The basket should stand without severe twisting, but its stiffness depends heavily on fabric and interfacing. If a test basket collapses more than you want, do not simply add multiple unknown layers of fusible interfacing: choose a product designed for the required structure and verify that your machine can handle the resulting thickness.
Before cutting valuable fabric
- Test interfacing on scrap and follow its own application instructions.
- Mark all four 2 in corner squares from the raw edges before cutting them away.
- Confirm your machine, needle and presser foot can feed the thickest seam intersection.
- Make a test basket before changing corner size; boxed-corner dimensions affect width, depth and height together.