Simple elastic-waist skirt
Make a simple two-panel skirt while learning how body measurements, wearing ease, a casing and a hem work together.
Confident beginner
Measurements · casing · hemming
1/2 in side seams
Measure hip and desired length
Choose the measurements
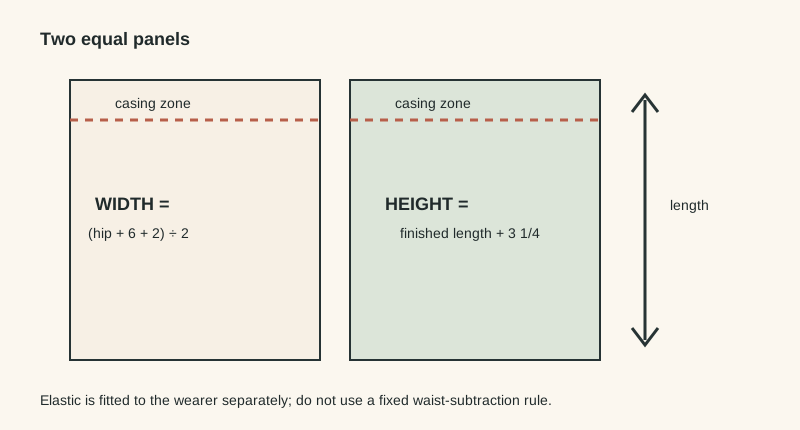
This project uses two rectangles and is intended for a stable light-to-medium woven fabric. Measure the fullest hip circumference (H) and the desired finished skirt length from the intended waistband position (L). The design adds 6 in of total hip ease so the skirt can pull over the hips; increase that if you want more fullness.
(H + 6 in + 2 in seam allowance) ÷ 2
L + 3 1/4 in
1 in wide; fit to wearer
Check the formula before cutting
Example only: with a 40 in hip, each panel is (40 + 6 + 2) ÷ 2 = 24 in wide. After two 1/2 in side seams, the skirt body circumference is 46 in: the 40 in hip plus 6 in ease. The height allowance provides 1 3/4 in at the top for a 1/2 in turn-under plus a 1 1/4 in casing, and 1 1/2 in at the bottom for a 1/2 in plus 1 in double-fold hem.
1. Sew the side seams
Place the panels right sides together and sew both side seams at 1/2 in. Finish the raw seam allowances using a method appropriate to your fabric, then press the seams as the fabric permits.
2. Form the waistband casing
At the top, press 1/2 in to the wrong side, then 1 1/4 in again. Stitch close to the lower folded edge, leaving a 2–3 in opening for inserting the elastic. The casing should comfortably accommodate 1 in elastic without stitching through it.
3. Fit the elastic instead of relying on a formula
Wrap the elastic at the intended waist position and adjust until it feels secure but comfortable enough to sit, breathe and move. Elastic brands and bodies vary, so there is no responsible universal subtraction from the waist measurement. Add enough overlap for a secure join, and temporarily pin the overlap before final stitching. Keep the elastic flat rather than twisted.
4. Join the elastic and close the casing
Once the fit is confirmed, securely stitch the overlapped elastic ends using a method appropriate to the elastic and your machine. Distribute the fabric gathers evenly, then close the casing opening without catching the elastic.
5. Hem and reassess length
Try the skirt on before committing to the hem if possible. Press the lower edge 1/2 in to the wrong side and then 1 in again. Stitch close to the inner fold. Because bodies are three-dimensional, the visual hem level may differ slightly from the arithmetic length; a helper can mark an even hem if that matters for your version.
Fit and safety checkpoint
The skirt must pull comfortably over the fullest hip, the elastic must not feel restrictive, and the wearer should be able to sit and move normally. For children or anyone unable to communicate discomfort reliably, use an appropriate professionally drafted pattern rather than relying on this simplified adult beginner exercise.
Before cutting valuable fabric
- Make the width calculation on paper and check it twice.
- Use the fullest hip measurement, not just the waist measurement.
- Prewash fabric and elastic if their care instructions make that appropriate.
- Make a low-cost test version before using special fabric or altering the amount of ease.